Garuda Mini Experiments
How to Fly!!
- Anyone who flies the drone need to know proper piloting before flying the drone.
Disclaimer : In any case if you miss to follow the instruction manual, e-Yantra is not responsible for any loss.
Important Note :First learn to fly in simulator ex. LiftOff for atleast 50 to 60 hours and first flight should be in AltHold Mode explicetly for the Garuda Mini as there is ground effect and drone can topple.
Ensure Your Setup is Complete
- Confirm that your setup is complete.
- Select the GARUDAMINI model on your Radio Master.
- Verify that the Cellular Tower is visible on the Swift Pro Max screen.
- Ensure the drone can be armed and disarmed properly.
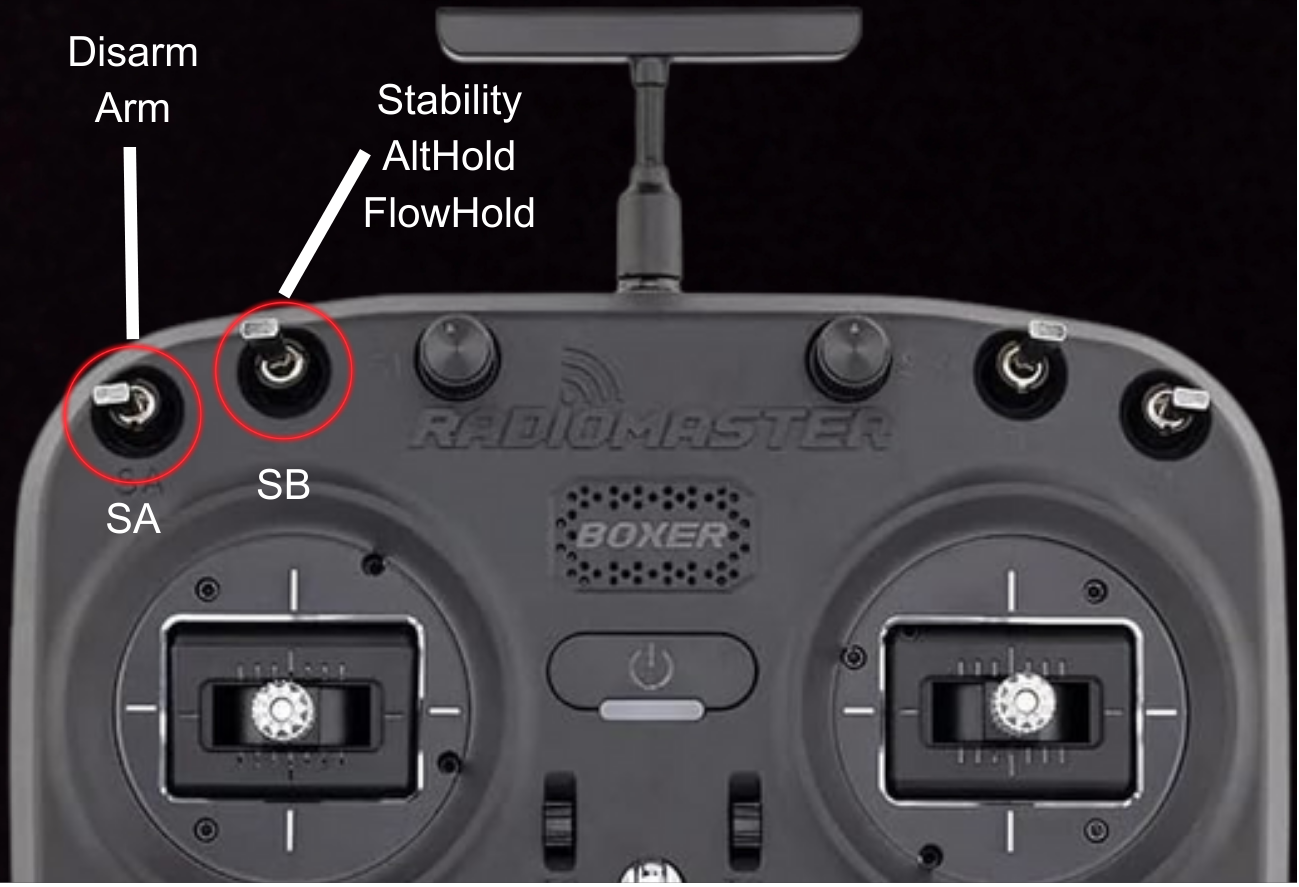
The SA button controls the Arm/Disarm function.
- SA Switch UP: Disarm State.
- SA Switch DOWN: Arm State.
The SB button controls the Flight Modes.
- SB Switch UP: Stabilize Mode.
- SB Switch CENTER: AltHold Mode.
- SB Switch DOWN: FlowHold Mode.
How to set Flight modes on RC buttons.
- Connect the Drone via USB wire.
- And also Power on the Radio Master and connect to the drone.
- Go to
Mission Plannerand connect it. - Go to
SETUP-->Flight Modes.
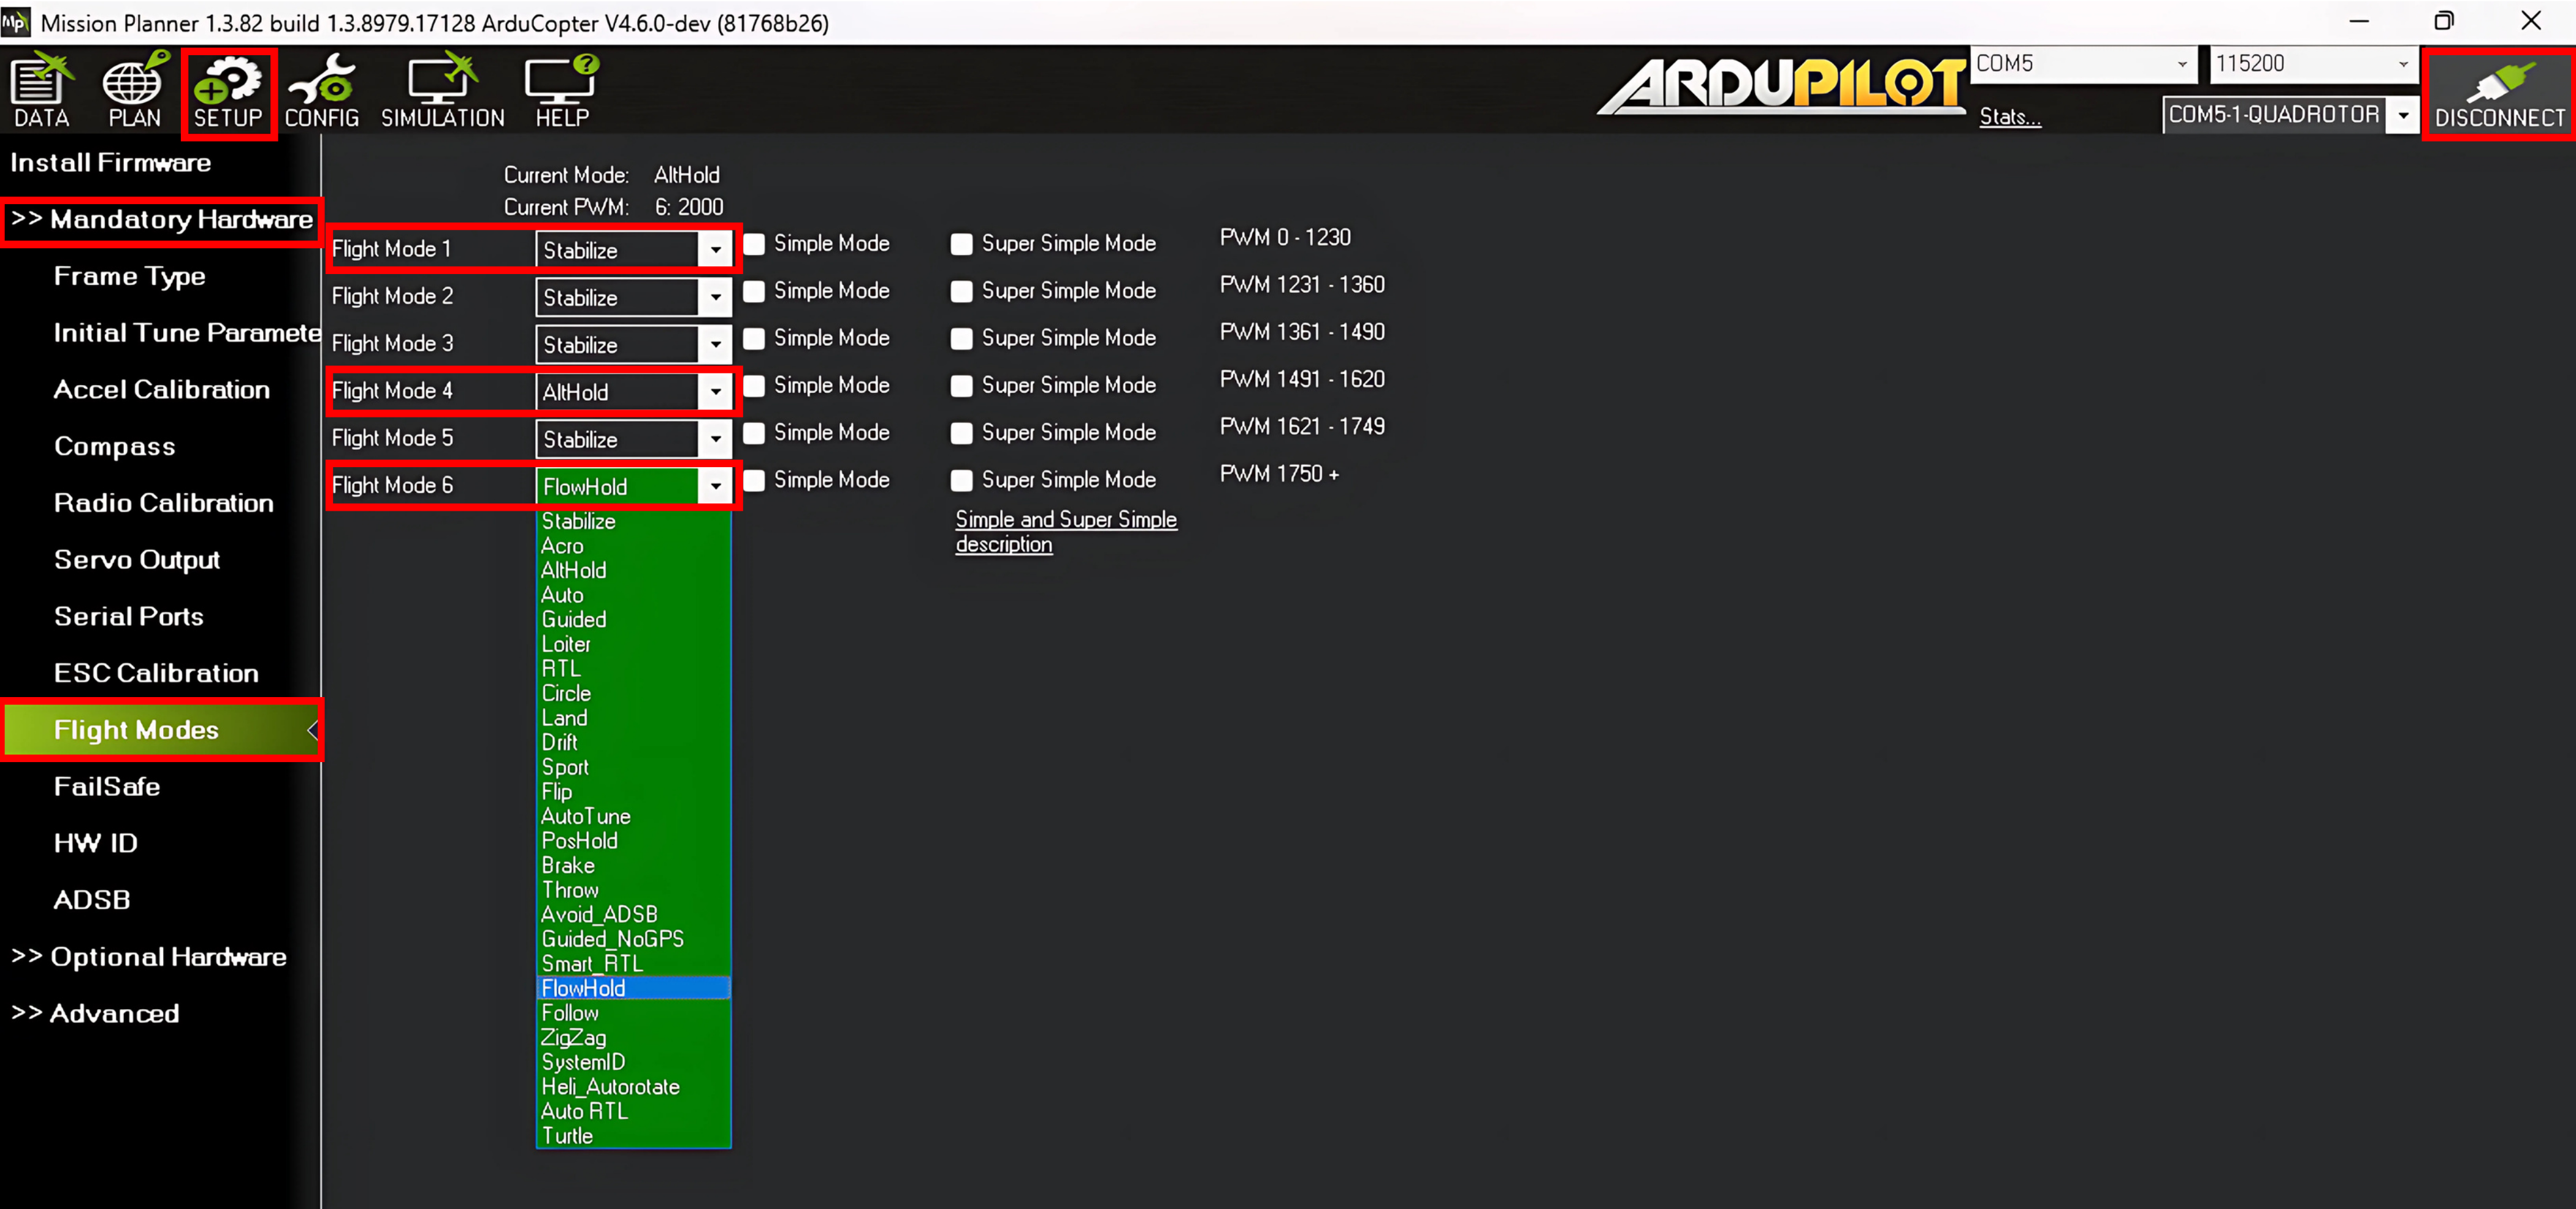
- If you have booted Custom Firmware you can use FlowHold Mode.
- Just see by switching
SBkey on RadioMaster Boxer the Flight mode changes fromFlight Mode 1toFlight Mode 4toFlight Mode 6. - Set whatever you want but for safety keep Stabalize Mode so that if drone doesn't response properly you can quickly switch to stabilize mode and take a manual control.
1. Fly in Stabilize Mode
- This mode is essential for all other flight modes.
- Prerequisite: Learn to fly a drone using a simulator. Aim for about 40-50 hours of practice. You can use the Liftoff Simulator.
Once you've learned to fly, follow these steps while prioritizing safety:
- Ensure the throttle stick is down and the roll/pitch is centered.
- Pull the SA switch down (SA: DOWN) to arm the drone.
- Keep the SB switch up (SB: UP) in Stabilize Mode initially.
- Gradually increase the throttle to lift off and land.
- As you gain confidence, practice performing roll and pitch maneuvers.
- After some practice, you’ll be ready to fly in different modes.
2. Fly in AltHold Mode
- Prerequisite: You must master Stability Mode to maintain manual control if the drone goes out of control.
- Once you're proficient in Stability Mode, you can move to AltHold Mode.
- Ensure the throttle stick is down and the roll/pitch is centered.
- Pull the SA switch down (SA: DOWN) to arm the drone.
- Set the SB switch to center (SB: CENTER) for AltHold Mode.
Key Points:
- In AltHold mode, you provide velocity rather than angles. At 0% throttle, the drone will begin to decelerate based on the settings in the full parameter list.
- At 50% throttle, the drone will maintain its current position.
- At 100% throttle, it will climb at the rate specified in the parameter list.
- Between 0-50%, the throttle maps speed from 0 to maximum deceleration.
- Between 50-100%, it maps speed from 0 to maximum acceleration.
- Gradually increase the throttle to lift off and land.
- This mode will automatically level the drone, but you still need to manage roll and pitch.
The RangeFinder operates effectively up to 120 cm from the ground; beyond that, the barometer takes over due to sensor limitations. If the drone becomes unmanageable, switch back to Stability Mode (SB: UP) to regain control.
3. Fly in PosHold Mode
Note: Fly the drone in PosHold when SAT count on Telementry screen is more that 8.
- The PosHold flight mode is similar to Loiter in that the vehicle maintains a constant location, heading, and altitude but is generally more popular because the pilot stick inputs directly control the vehicle’s lean angle providing a more “natural” feel.
- When switched on, PosHold mode will automatically attempts to maintain the current location, heading and altitude.
- The pilot can control the copter’s location horizontally and vertically with the control sticks.
Key Points:
- In PosHold mode, you provide velocity rather than angles. At 0% throttle, the drone will begin to decelerate based on the settings in the full parameter list.
- At 50% throttle, the drone will maintain its current position.
- At 100% throttle, it will climb at the rate specified in the parameter list.
- Between 0-50%, the throttle maps speed from 0 to maximum deceleration.
- Between 50-100%, it maps speed from 0 to maximum acceleration.
- Gradually increase the throttle to lift off and land.
4. Fly in Loiter Mode
Note: Fly the drone in Loiter when SAT count on Telemetry screen is more than 8.
The Loiter flight mode allows the vehicle to maintain a constant position and altitude, while the pilot retains control over the heading. This mode is often used for hovering and can be useful when you want to keep the drone in a fixed position while making small adjustments. When activated, Loiter mode attempts to automatically hold the vehicle’s position and altitude without pilot input, but the heading will still be controlled by the pilot. The pilot can use the control sticks to adjust the drone's position horizontally and maintain a stable altitude.Key Points:
- In Loiter mode, you provide velocity rather than angles. At 0% throttle, the drone will begin to decelerate based on the settings in the full parameter list.
- At 50% throttle, the drone will maintain its current position.
- At 100% throttle, it will climb at the rate specified in the parameter list.
- Between 0-50%, the throttle maps speed from 0 to maximum deceleration.
- Between 50-100%, it maps speed from 0 to maximum acceleration.
- Gradually increase the throttle to lift off and land.